

API Authentication with Sanctum on Laravel 9 - In this article, I will share how to set REST API authentication with Sanctum so our route will be protected.
Step 1 - Laravel Installation
composer create-project laravel/laravel sanctum-auth
#OR
composer global require laravel/installer
laravel new sanctum-auth
First, we need to create/install fresh Laravel project. We can choose installation method, with composer, laravel installer, or using Sail. You can choose as you want. If installation is done, go to inside created directory with cd sanctum-auth.
Step 2 - Setup Database
DB_CONNECTION=mysql
DB_HOST=mysql
DB_PORT=3306
DB_DATABASE=sanctum-auth
DB_USERNAME=laravel
DB_PASSWORD=password
Next step, create new database and set database configuration on **.env** file.
Step 3 - Install Sanctum
composer require laravel/sanctum
Laravel 9 comes up Laravel Sanctum. However, in case your app doesn't include it, you may follow this step.
php artisan vendor:publish --provider="Laravel\Sanctum\SanctumServiceProvider"
Next, publish the configuration files using the vendor:publish Artisan command. The config file will be generated on config directory.
php artisan migrate
Then, run database migrations to create one database table in which to store API tokens.
Step 4 - Create Auth Controller
php artisan make:controller Api/AuthController
Create controller file inside app/Http/Controllers/Api directory with name AuthController with command above. You can change controller name as you want, we will use this controller to process authentication processes like login, register or logout.
<?php

namespace App\Http\Controllers\Api;

use App\Http\Controllers\Controller;
use App\Models\User;
use Illuminate\Support\Facades\Hash;
use Illuminate\Http\Request;
use Illuminate\Validation\ValidationException;

class AuthController extends Controller
{
    public function register(Request $request)
    {
        $validated = $request->validate([
            'name' => 'required|string|max:255',
            'email' => 'required|string|email|max:255|unique:users',
            'password' => 'required|string|min:8'
        ]);

        $user = User::create([
            'name' => $validated['name'],
            'email' => $validated['email'],
            'password' => Hash::make($validated['password'])
         ]);

        $token = $user->createToken('auth_token')->plainTextToken;

        return response()->json(['email' => $user->email,'access_token' => $token, 'token_type' => 'Bearer', ]);
    }

    public function login(Request $request)
    {
        $validated = $request->validate([
            'email' => 'required|string|email|exists:users,email',
            'password' => 'required'
        ]);

        $user = User::where('email', $validation['email'])->first();

        if (! $user || ! Hash::check($validation['password'], $user->password)) {
            throw ValidationException::withMessages([
                'email' => ['Your credetial is wrong'],
            ]);
        }

        $token = $user->createToken('auth_token')->plainTextToken;

        return response()->json(['email' => $user->email,'access_token' => $token, 'token_type' => 'Bearer', ]);
    }

    public function logout(Request $request)
    {
        auth()->user()->tokens()->delete();

        return response()->json();
    }
}
Update AuthController, this is the explanation from code above:
- Register: Controller will validate input from user and save user data to the database if validation passed. After that user will automatically logged in with saved token and return it.
- Login: Controller will validate input from user and check if user with email and password are exist in database.
- Logout: Token will removed in this controller.
Step 5 - Define Route
<?php

use App\Http\Controllers\Api\AuthController;
use Illuminate\Support\Facades\Route;

Route::post('register', [AuthController::class, 'register']);
Route::post('login', [AuthController::class, 'login']);

Route::middleware('auth:sanctum')->group(function () {
    Route::get('/', function () {
        return response()->json('You are logged in');
    });
    Route::post('logout', [AuthController::class, 'logout']);
});
In this step, edit routes/api.php file. We defined four route (login, register, logout, and home). Home and logout route are protected with auth:sanctum middleware, so only authenticated user can access it.
Step 6 - API Testing
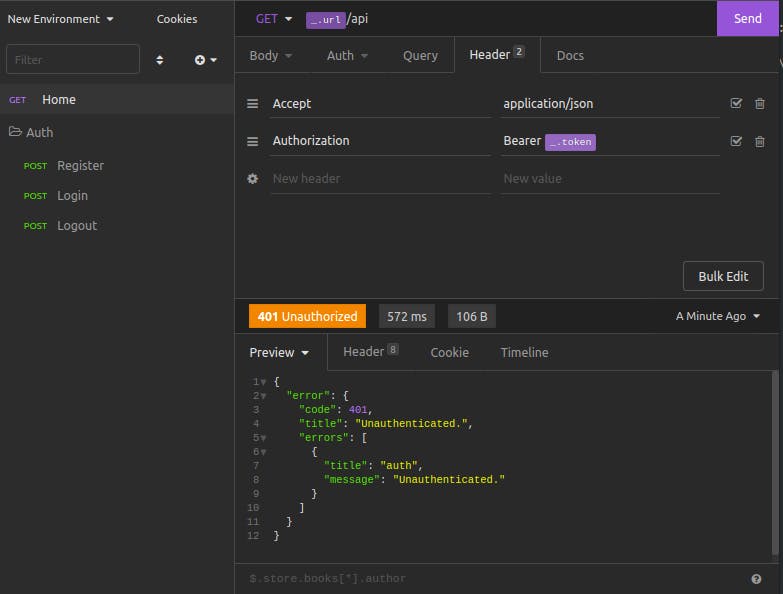 Let's try access home api url, I use Insomnia and set
 url and token on the environment. If user not logged in, we will get error auth response.
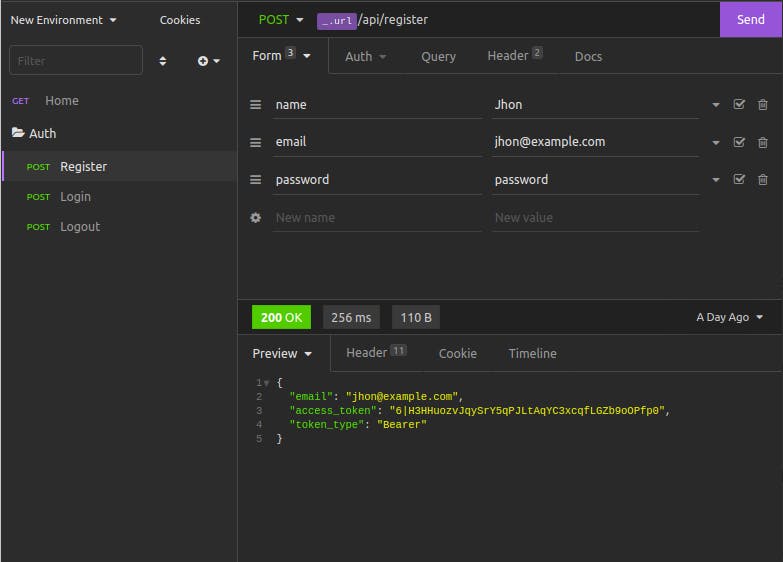 This is request and response for register. When user successfully registered, they will automatically logged and get access token. This token will be used for other requests if they need authorization. Let's check home request if using generated access token.
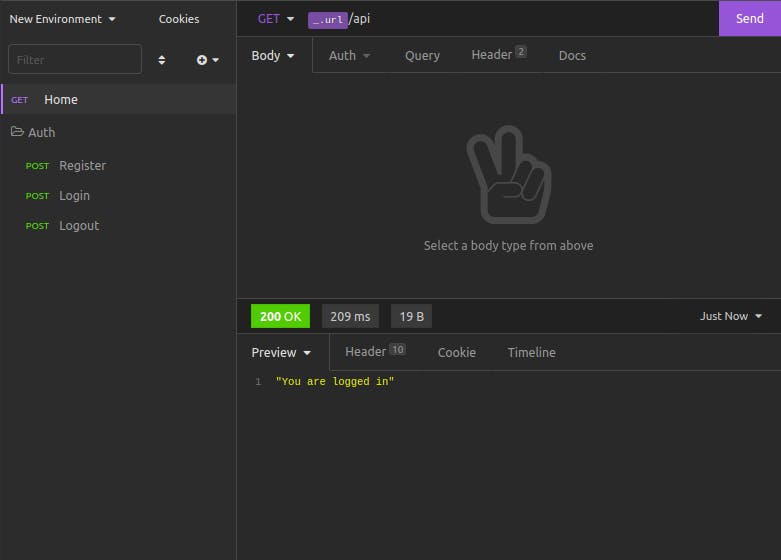 Here is the result. We can access it and get 200 response.
Closing
That's all. I only share the very basic use of Sanctum, visit the official docs for more information about Laravel Sanctum.